- Sharing REST API specification
- Serverless Swagger UI solution architecture
- Creating mock API Gateway
- Hosting Swagger UI website on S3
- Building Swagger UI website
- Deploying website to S3 with Serverless
- Authenticating with Cognito
- Exposing website by CloudFront
- Creating Cognito User and Identity Pools
- Retrieving resources parameters
- Performing user authentication
- Testing Cognito user authentication
- Fetching OpenAPI Spec from API Gateway
- Conclusion
Amazon API Gateway provides an option to export the API schema as an OpenAPI Specification. With it, we can display our REST API as an interactive website. But we do not get a public URL to that specification file which we could use as a source for an interactive page like Swagger. Instead, we can only get the file from the AWS Console, CLI, or SDK.
This is why we need to do a few additional steps to get our beautiful documentation working. As a result, we will get a fully customizable website, with easy to implement access protection. And, maybe the most important, it will be always up-to-date, with no work required after changes in the API Gateway endpoints.
This is quite a long post with a step-by-step implementation guide. If in a hurry, jump straight to the end, where you will find a link to the repository with full implementation.
Sharing REST API specification
Amazon API Gateway is a basic building block for most serverless AWS applications. It allows creating a serverless API for Lambda functions, existing HTTP services, and any other AWS service.
When we build an API we often need to share it – with other developers, other teams, our clients, or publicly. And the de facto standard for sharing REST API docs is to create OpenAPI Specification (OAS) and visualize it as an interactive website, for which the most popular engine is the Swagger UI.
API Gateway allows generating such specification but provides no built-in solution to share it. You don’t get a public URL to access the OAS. You can only download it.
I cannot imagine having to manually export the OAS file after every API deployment and send it by email or save on some Confluence page to provide it for other people. Or even uploading it by-hand to a self-hosted Swagger UI page. It’s the kind of a process that everyone will forget to do on the nearest occasion.
But fear not, here is how to create a serverless, interactive, and always up-to-date Swagger UI for the API Gateway. Moreover, with a few additional lines of code, we can make it protected with user authentication using Amazon Cognito.
Serverless Swagger UI solution architecture
I will use the Serverless Framework to build and deploy all resources to AWS. Here is the architecture of the whole solution.
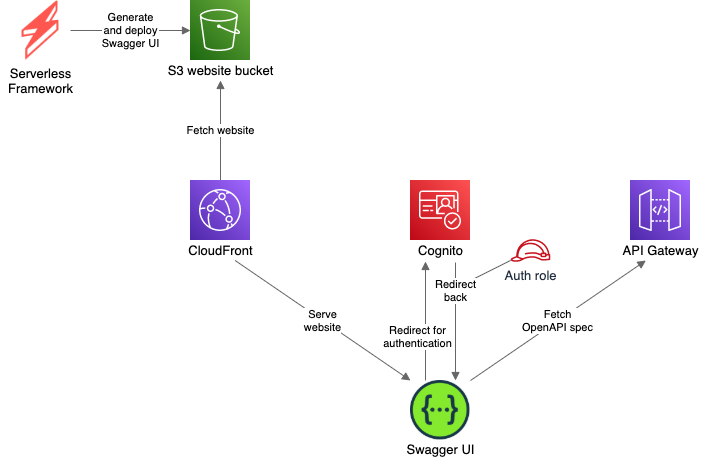
The Swagger UI website will be built and deployed to the S3 bucket. From there it will be hosted as a static website.
To limit access only to authenticated users we will use the Amazon Cognito service. Cognito requires our page to use the HTTPS. S3 website hosting does not support that, so we will use a CloudFront as a simple proxy that will provide an HTTPS URL for the website.
Here is the flow of what will happen when the user opens the page:
- Load website files from the S3 bucket, via CloudFront
- Check if the user is already authenticated
- If not, redirect him to the Cognito auth page
- After successful authentication, Cognito will redirect the user back to our page
- Obtain OpenAPI specification from the API Gateway
- Display Swagger UI
Creating mock API Gateway
We will start with a simple REST API with two mocked endpoints, one GET and one POST. Mock endpoints are easy to define with Serverless.
service: swaggerui

provider:
  name: aws
  stage: ${opt:stage, 'dev'}

functions:
  hello:
    handler: handler.hello
    events:
      - http:
          path: hello
          cors: true
          method: GET
          integration: mock
          request:
            template:
              application/json: '{"statusCode": 200}'
          response:
            template: >
              {
                "greeting": "Hello $input.params('name')!"
              }
            statusCodes:
              201:
                pattern: ''
      - http:
          path: hello
          cors: true
          method: POST
          integration: mock
          request:
            template:
              application/json: '{"statusCode": 200}'
          response:
            statusCodes:
              201:
                pattern: ''
After deploying this stack, we should have a working API Gateway that we can test.
Hosting Swagger UI website on S3
Building Swagger UI website
The next step is to build and deploy the Swagger UI website. As it’s a simple single-page application, the S3 bucket with the website hosting feature will be the easiest and cheapest solution.
A custom Swagger UI website can be built with the swagger-ui-dist package. We do not want to copy all the frontend files to our project by hand and committing them to our repository, we treat it just like any other library.
The website will be built with webpack.
webpack.config.js configuration file:
const {CleanWebpackPlugin} = require('clean-webpack-plugin');
const HtmlWebpackPlugin = require('html-webpack-plugin');

module.exports = {
    mode: 'development',
    devtool: 'source-map',
    entry: './src/index.ts',
    module: {
        rules: [
            {
                test: /\.ts$/,
                use: ['ts-loader'],
                exclude: /node_modules/,
            },
            {
                test: /\.(css)$/,
                exclude: /node_modules/,
                use: [
                    'style-loader',
                    'css-loader',
                ]
            },
        ]
    },
    resolve: {
        extensions: ['.js', '.ts'],
    },
    output: {
        path: __dirname + '/dist',
        publicPath: '/',
        filename: 'bundle.js'
    },
    plugins: [
        new CleanWebpackPlugin(),
        new HtmlWebpackPlugin({
            title: 'Example API',
            template: 'src/index.ejs',
        }),
    ],
    performance: {
        hints: false,
    },
};
src/index.ejs template:
<!DOCTYPE html>
<html lang="en">
<head>
    <meta charset="utf-8">
    <title><%= htmlWebpackPlugin.options.title %></title>
</head>
<body>

<div id="swagger"></div>

</body>
</html>
Our stylesheet is simple as well. Its role is to load the Swagger UI styles and improve the overall page style a little bit.
@import '~swagger-ui-dist/swagger-ui.css';

body {
    margin: 0;
    background: #fafafa;
}
And finally, the scripts that are the heart of our website.
Firstly, we need a script to handle Swagger UI displaying. For now, we will load the sample “Petstore” API spec, just to check if the UI works correctly.
import {SwaggerUIBundle} from 'swagger-ui-dist';

export const initSwagger = (): void => {
    SwaggerUIBundle({
        url: 'https://petstore.swagger.io/v2/swagger.json',
        'dom_id': '#swagger',
        deepLinking: true,
    });
};
Secondly, the main script. It will load the styles and init Swagger UI.
import './style.css';

initSwagger();
Deploying website to S3 with Serverless
Building and deploying a website should happen every time we deploy the Serverless stack. We do not want to remember it and do it manually every time. Automating it takes it out of our responsibilities.
Two Serverless framework plugins come here with help. The serverless-scriptable-plugin will allow website build commands execution as part of the deployment process, and the serverless-s3-deploy will upload the build output to the S3 bucket.
We also need to create the S3 bucket itself.
# ...

plugins:
  - serverless-s3-deploy
  - serverless-scriptable-plugin

custom:
  scriptHooks:
    after:aws:deploy:deploy:updateStack:
      - webpack --mode production --progress

  assets:
    auto: true
    targets:
      - bucket: !Ref SwaggerBucket
        files:
          - source: dist
            empty: true
            globs: '**/*'

# ...

resources:
  Resources:

    SwaggerBucket:
      Type: AWS::S3::Bucket
We do not enable website hosting in the S3 bucket.
It’s not needed, since Swagger UI does not require to load index.html for any other path than the root path (/). We can keep files in this bucket private, only allowing CloudFront to access them.
Authenticating with Cognito
The next part is to restrict access to the API documentation. For this, we will use AWS Cognito, which gives an out-of-the-box solution for user management and authentication.
Exposing website by CloudFront
The simplest solution for website hosting is to use a built-in option in S3 bucket. The drawback of it is that the page is available only over HTTP, not HTTPS. In the authentication process we will be redirecting the user between our website and Cognito’s one. The Cognito does not allow redirects back to not-secured URLs, which is wise, since the redirect contains an access token that is better kept not exposed.
Because of this, we must expose our S3-hosted website by the CloudFront. The CloudFront can provide us an SSL certificate and host the content by the HTTPS.
The biggest drawback of the CloudFront is the creation and update time. Despite the fact we are using it here as a simple proxy, it’s, in fact, a global CDN service. Its deployment, with all the changes propagation over the world, takes a while.
In our CloudFront Distribution, for all requests we return files from the S3 bucket. Because objects in the bucket are not public, we need to setup access to them for the CloudFront. We also make sure that all clients are always using HTTPS.
# ...

resources:
  Resources:

    # ...

    SwaggerDistribution:
      Type: AWS::CloudFront::Distribution
      Properties:
        DistributionConfig:
          Enabled: true
          Comment: ${self:custom.baseName}-swaggerui
          HttpVersion: http2
          Origins:
            - Id: swaggerS3
              DomainName: '#{SwaggerBucket.RegionalDomainName}'
              S3OriginConfig:
                OriginAccessIdentity: 'origin-access-identity/cloudfront/#{SwaggerDistributionOAI}'
          DefaultRootObject: index.html
          DefaultCacheBehavior:
            TargetOriginId: swaggerS3
            AllowedMethods:
              - GET
              - HEAD
            CachedMethods:
              - GET
              - HEAD
            Compress: true
            ViewerProtocolPolicy: redirect-to-https
            ForwardedValues:
              QueryString: 'false'
              Cookies:
                Forward: none
          PriceClass: PriceClass_100
          ViewerCertificate:
            CloudFrontDefaultCertificate: 'true'

    SwaggerBucketCloudFrontAccessPolicy:
      Type: AWS::S3::BucketPolicy
      Properties:
        Bucket: !Ref SwaggerBucket
        PolicyDocument:
          Statement:
            - Action: s3:GetObject
              Effect: Allow
              Resource: 'arn:aws:s3:::#{SwaggerBucket}/*'
              Principal:
                CanonicalUser: !GetAtt SwaggerDistributionOAI.S3CanonicalUserId

    SwaggerDistributionOAI:
      Type: AWS::CloudFront::CloudFrontOriginAccessIdentity
      Properties:
        CloudFrontOriginAccessIdentityConfig:
          Comment: 'Access #{SwaggerBucket} bucket'
Creating Cognito User and Identity Pools
The Cognito User Pool will manage users with access to the Swagger website and provide an authentication mechanism. Thanks to that we don’t need to create a login form by ourselves – we will use the one provided by the Cognito. This reduces our work to the minimum.
We need to create 3 resources for this – the User Pool itself, a domain name to be used for our login page, and an App Client for our website, so it will be able to use the authentication mechanism. Change the domain name to something unique, otherwise the deployment will most likely fail.
The next piece is the Cognito Identity Pool. It’s a service that will provide our authenticated users temporary AWS credentials.
We create and assign to the users the SwaggerUIAuthRole. It has an access policy allowing them to obtain the API Specification from our API Gateway.
This will be needed in our final step, where we will replace the sample Petstore API definition with the actual specification fetched from our API Gateway.
The serverless-cloudformation-sub-variables plugin will ease referencing resources.
# ...

plugins:
  # ...
  - serverless-cloudformation-sub-variables

# ...

resources:
  Resources:

    # ...

    UserPool:
      Type: AWS::Cognito::UserPool
      Properties:
        UserPoolName: swaggerui
        Schema:
          - Name: email
            Required: true
            Mutable: true
        AdminCreateUserConfig:
          AllowAdminCreateUserOnly: true

    UserPoolDomain:
      Type: AWS::Cognito::UserPoolDomain
      Properties:
        UserPoolId: !Ref UserPool
        Domain: my-api-swaggerui

    SwaggerUIAppClient:
      Type: AWS::Cognito::UserPoolClient
      Properties:
        ClientName: SwaggerUI
        UserPoolId: !Ref UserPool
        GenerateSecret: false
        SupportedIdentityProviders:
          - COGNITO
        AllowedOAuthFlowsUserPoolClient: true
        AllowedOAuthFlows:
          - code
        AllowedOAuthScopes:
          - email
          - openid
        CallbackURLs:
          - 'https://#{SwaggerDistribution.DomainName}'
        LogoutURLs:
          - 'https://#{SwaggerDistribution.DomainName}'

    SwaggerUIIdentityProvider:
      Type: AWS::Cognito::IdentityPool
      Properties:
        IdentityPoolName: swaggerui
        CognitoIdentityProviders:
          - ProviderName: 'cognito-idp.#{AWS::Region}.amazonaws.com/#{UserPool}'
            ClientId: !Ref SwaggerUIAppClient
        AllowUnauthenticatedIdentities: false

    SwaggerUIIdentityProviderRoles:
      Type: AWS::Cognito::IdentityPoolRoleAttachment
      Properties:
        IdentityPoolId: !Ref SwaggerUIIdentityProvider
        Roles:
          authenticated: !GetAtt SwaggerUIAuthRole.Arn

    SwaggerUIAuthRole:
      Type: AWS::IAM::Role
      Properties:
        AssumeRolePolicyDocument:
          Version: '2012-10-17'
          Statement:
            - Effect: Allow
              Principal:
                Federated: cognito-identity.amazonaws.com
              Action: sts:AssumeRoleWithWebIdentity
              Condition:
                StringEquals:
                  cognito-identity.amazonaws.com:aud: !Ref SwaggerUIIdentityProvider
                ForAnyValue:StringLike:
                  cognito-identity.amazonaws.com:amr: authenticated
        Policies:
          - PolicyName: api-gateway
            PolicyDocument:
              Version: '2012-10-17'
              Statement:
                - Effect: Allow
                  Action: apigateway:GET
                  Resource: "arn:aws:apigateway:#{AWS::Region}::/restapis/#{ApiGatewayRestApi}/stages/${self:provider.stage}/exports/*"
Retrieving resources parameters
To interact with the resources we created we need to put their generated parameters (like User Pool ID) in the website configuration. We could, of course, deploy everything, check the generated values, and then hardcode them into the page code. However, that would make the solution working only for our single environment, which is, obviously, a bad idea.
To solve that, we will add a script extracting all the required parameters from the stack. It will be run after the stack deployment, but before building the website. The parameters will be saved as a JSON file that later can be read from the page scripts.
The script, run from Serverless, uses its SDK to execute AWS SDK commands.
Read more about that approach in the article about auto-generating environment parameters.
'use strict';

const fs = require('fs');

const provider = serverless.service.provider;
const awsProvider = serverless.getProvider('aws');

const listStackResources = async (resources, nextToken) => {
    resources = resources || [];
    const response = await awsProvider.request('CloudFormation', 'listStackResources', {
        StackName: awsProvider.naming.getStackName(),
        NextToken: nextToken
    });
    resources.push(...response.StackResourceSummaries);

    if (response.NextToken) {
        return listStackResources(resources, response.NextToken);
    }

    return resources;
}

const createConfig = stackResources => ({
    region: provider.region,
    cognito: {
        identityPoolId: getPhysicalId(stackResources, 'SwaggerUIIdentityProvider'),
        userPoolId: getPhysicalId(stackResources, 'UserPool'),
        userPoolWebClientId: getPhysicalId(stackResources, 'SwaggerUIAppClient'),
        oauthDomain: `${getPhysicalId(stackResources, 'UserPoolDomain')}.auth.${provider.region}.amazoncognito.com`,
    },
    apiGateway: {
        restApiId: getPhysicalId(stackResources, 'ApiGatewayRestApi'),
        stageName: provider.stage,
    },
});

const getPhysicalId = (stackResources, logicalId) => {
    return stackResources.find(r => r.LogicalResourceId === logicalId).PhysicalResourceId || '';
};

const writeConfigFile = config => {
    fs.writeFileSync('./src/config.json', JSON.stringify(config));
};

listStackResources()
    .then(createConfig)
    .then(writeConfigFile);
# ...

custom:
  scriptHooks:
    after:aws:deploy:deploy:updateStack:
      - generateConfigFile.js
      - webpack --mode production --progress

# ...
Performing user authentication
The Cognito offers a built-in login panel, but we still need to integrate our website with it. It will require a few changes in the website code.
Firstly, we will add a topbar to the page to display the currently logged in user and allow him to log out.
<!-- ... -->

<div id="topbar" class="swagger-ui">
    <div class="wrapper">
        Logged as <span id="username"></span>
        <button id="logout">Logout</button>
    </div>
</div>

<!-- ... -->
#topbar {
    background-color: #1b1b1b;
    padding: 15px 0;
    color: #fafafa;
    text-align: right;
}

#logout {
    display: inline-block;
    margin-left: 30px;
    border: none;
    border-radius: 3px;
    color: #ffffff;
    text-shadow: 0 1px 0 rgba(0, 0, 0, .1);
    font-size: 13px;
    background: rgb(137, 191, 4);
    padding: 6px 15px;
    text-decoration: none;
    text-transform: uppercase;
    font-weight: bold;
}
Secondly, we need to read the generated config parameters file.
import configFile from './config.json';

export const config = configFile as Config;

export interface Config {
    region: string;
    cognito: {
        identityPoolId: string;
        userPoolId: string;
        userPoolWebClientId: string;
        oauthDomain: string;
    };
    apiGateway: {
        restApiId: string;
        stageName: string;
    };
}
Now, having all the required parameters, we can integrate with the Cognito. To do so we will use the AWS Amplify library. The logic is pretty trivial. Apart from configuring the Amplify, we only store the current authentication process state.
import Auth, {CognitoUser} from '@aws-amplify/auth';
import Amplify, {Hub} from '@aws-amplify/core';
import {config} from './config';

/**
 * Is OAuth authentication in progress.
 * After redirection from Cognito Hosted UI to obtain user tokens
 * several requests are executed to finish OAuth Authorization code grant path.
 */
let isAuthenticating = false;

let isAuthenticationFailure = false;

/**
 * Promise that will be resolved after successful user signing in
 * or rejected after unsuccessul.
If signing in is not initiated,
 * this will never be resolved.
 * As a side-effect, current auth status is updated along the process.
 */
const signedInUser: Promise<CognitoUser> = new Promise((resolve, reject) => {
    Hub.listen('auth', ({payload: {event, data}}) => {
        switch (event) {
        case 'codeFlow':
            isAuthenticating = true;
            break;
        case 'signIn':
            isAuthenticating = false;
            resolve(data);
            break;
        case 'signIn_failure':
            isAuthenticating = false;
            isAuthenticationFailure = true;
            reject();
            break;
        }
    });
});

/**
 * Configure Amplify authentication.
 * If required, this will trigger user token validation (to finish Authorization code grant path after redirect from Cognito Hosted UI)
 * or refresh (to get new access token).
 */
Amplify.configure({
    Auth: {
        // Amazon Cognito Region
        region: config.region,
        // Amazon Cognito Identity Pool ID
        identityPoolId: config.cognito.identityPoolId,
        // Amazon Cognito User Pool ID
        userPoolId: config.cognito.userPoolId,
        // Amazon Cognito Web Client ID (26-char alphanumeric string)
        userPoolWebClientId: config.cognito.userPoolWebClientId,
        oauth: {
            // Amazon Cognito domain name
            domain: config.cognito.oauthDomain,
            scope: ['email', 'openid'],
            redirectSignIn: window.location.origin,
            redirectSignOut: window.location.origin,
            // 'code' for Authorization code grant, 'token' for Implicit grant
            responseType: 'code',
        },
    },
});

/**
 * Waits for authentication end (if necessary)
 * and resolves with logged in user or rejects if user is not logged in.
 */
export const getUser = async (): Promise<CognitoUser> => {
    if (isAuthenticating) {
        return signedInUser;
    } else {
        return Auth.currentAuthenticatedUser();
    }
};

export const getIsAuthenticationFailure = (): boolean => isAuthenticationFailure;
The last piece is to actually start the authentication process. We do that right away when the user opens the page.
import './style.css';
import {getIsAuthenticationFailure, getUser} from './auth';
import {initSwagger} from './swagger';
import Auth from '@aws-amplify/auth';

getUser().then(user => {
    if (!user) {
        throw new Error('User not resolved');
    }

    const email = user.getSignInUserSession()?.getIdToken().payload.email;
    document.getElementById('username')!.innerText = email;

    document.getElementById('logout')!.addEventListener('click', () => {
        Auth.signOut();
    });
}).catch(() => {
    // don't redirect to login page if there was authentication failure to prevent redirection loop
    if (!getIsAuthenticationFailure()) {
        Auth.federatedSignIn();
    }
});

initSwagger();
Testing Cognito user authentication
With all of the above in place, we can test the user authentication on our website.
Deploy the updated stack. Then go to the Cognito User Pool in the AWS Console and create a new user. Next, go to the CloudFront and find the domain name for our distribution. Open that page.
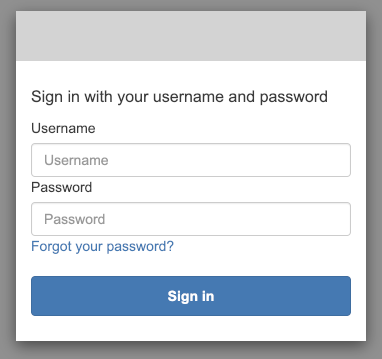
As soon as you open the website, it should redirect you to the Cognito hosted UI website with the login form. Type the created user’s credentials and you should be redirected back to our Swagger website, with the user’s email displayed in the top bar.
Fetching OpenAPI Spec from API Gateway
With secured access to the Swagger website, we can finally obtain the actual specification of our API. To have this specification always up-to-date we fetch it directly from the API Gateway. To do this, we use the API Gateway SDK with access credentials we get for our authenticated user. Those credentials allow us to make a call to export API Specification, accordingly to previously configured IAM policy.
import Auth from '@aws-amplify/auth';
import {config} from './config';
import APIGateway from 'aws-sdk/clients/apigateway';
import {ICredentials} from '@aws-amplify/core';
import {Spec, SwaggerUIBundle} from 'swagger-ui-dist'

export const initSwagger = async (): Promise<void> => {
    const credentials = await Auth.currentCredentials();
    const apiGateway = createAPIGatewayClient(credentials);
    const spec = await getAPIGatewaySpec(apiGateway);

    renderUI(spec);
};

const createAPIGatewayClient = (credentials: ICredentials): APIGateway => new APIGateway({
    region: config.region,
    accessKeyId: credentials.accessKeyId,
    secretAccessKey: credentials.secretAccessKey,
    sessionToken: credentials.sessionToken,
});

const getAPIGatewaySpec = async (apiGateway: APIGateway): Promise<Spec> => {
    const data = await apiGateway.getExport({
        restApiId: config.apiGateway.restApiId,
        stageName: config.apiGateway.stageName,
        exportType: 'oas30',
        accepts: 'application/json',
    }).promise();

    if (!data.body) {
        throw new Error('No documentation body received');
    }

    const spec = JSON.parse(data.body.toString()) as Spec;

    /** Remove leading "/" in base path that leads to incorrect URL with double "//". */
    spec.servers.forEach((server: { variables: { basePath: { default: string } } }) => {
        const basePath = server.variables.basePath.default;
        if (basePath.startsWith('/')) {
            server.variables.basePath.default = basePath.substr(1);
        }
    });

    return spec;
};

const renderUI = (spec?: Spec): void => {
    SwaggerUIBundle({
        spec: spec,
        'dom_id': '#swagger',
        deepLinking: true,
    });
};
Now, after you deploy the stack and open the page, you should see the documentation for our API. You can call the mock endpoints from it.
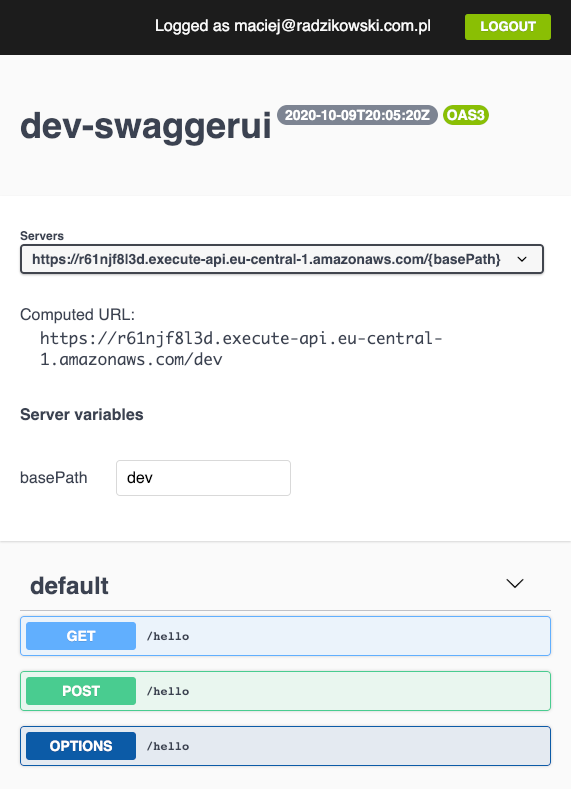
If, after the deployment, you still see the previous version of the page with the PetStore API, go to the CloudFront Distribution and invalidate its cache.
Conclusion
With a minimal amount of code and few AWS services, we can build a secured, serverless website with Swagger UI documenting our API. This makes it a great way to share the API specification with other developers.
All of the used AWS services are available in the Free Tier offer. But even after the Free Trial, with only the (not public) usage by other development teams integrating with the API, the costs should be minimal. For the details see the S3, CloudFront, and Cognito pricing pages.
The documentation presented in Swagger UI may be enriched by specifying additional models and descriptions for the API elements. Check out the serverless-aws-documentation plugin that reduces the boilerplate when doing that with Serverless.
The full solution is available as the GitHub repository:
It contains additional elements, like launching the Swagger UI locally for the development and clearing the website bucket when removing the stack. Make sure to check it out!
Update 2020-11-02
Since Swagger UI, despite being a Single Page Application, does not use any other paths than the root path (/) that should load index.html, we do not have to use S3 website hosting.
We can keep objects in bucket private, giving access only for the CloudFront.
This should be preferred way, limiting access wherever possible.
I’ve updated code examples with a change for it.
- 📨 algorithm-independent information about new posts
- 📘 my ebook about Serverless on AWS
- ✅ zero spam
Unsubscribe anytime.
Unsubscribe anytime.