- Typical website hosting on AWS
- Backend API base URL
- Need for specified parameters
- Drawbacks of hardcoding values
- Deployment-time resolved website parameters
- AWS stack deployment with website upload
- Obtaining environment parameters from stack
- Reading parameters in website
- Parameters for local development
- Security note
- Derived implementations
- Final thoughts
There are multiple articles on how to host a static website or Single Page Application (SPA) on AWS. But they rarely go into the topic of setting up the environment variables for the frontend application.
Let’s look beyond the part where most tutorials end – with the website deployed, how to parametrize it to call correct backend APIs and resources. We will look at the usual deployment process and improve it. In the end, the application will automatically reference the services from its own environment, both when deployed and locally.
The full solution is linked as a repository at the end.
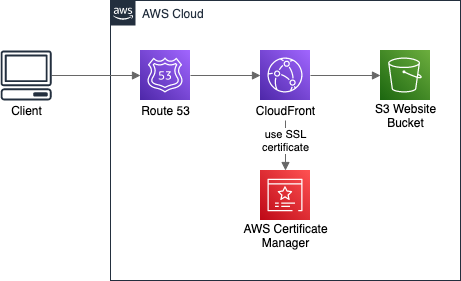
Typical website hosting on AWS
There is no difference between hosting a static website and a Single Page Application (SPA) on AWS. The best (and cheapest) way is to put it in S3 Bucket and enable Website Hosting for it. Then, depending on our needs, we can add a CloudFront Distribution in front of it for CDN, cache, and HTTPS. Having the CloudFront, we may also configure a custom domain with Route 53 and SSL certificate generated by ACM (AWS Certificate Manager). In the end, the architecture may look like this:
Backend API base URL
Most frontend applications do not stop there. They need to communicate with the backend.
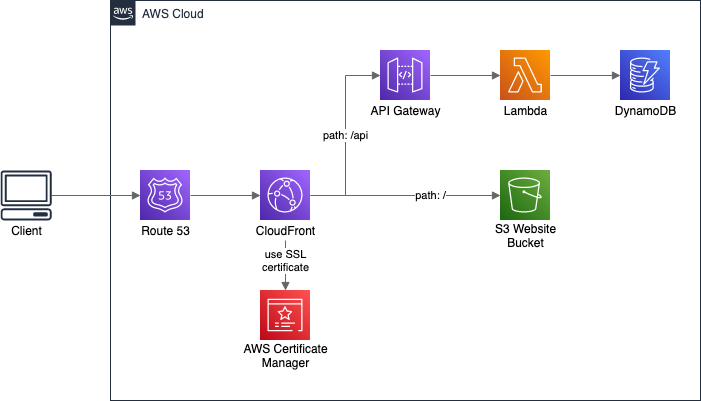
In terms of regular APIs, like REST or GraphQL, there is a simple solution for the API URL. We can put API Gateway or AppSync behind the same CloudFront Distribution as the website.
Then, when calling the backend, we do not provide a full URL with a domain name, but just a path with some prefix.
Most often it’s something like /api. The request will target the same domain as the one from which the frontend is hosted.
All we need to do is to configure CloudFront to pass requests starting with /api to the API service.
With both frontend and API served by the same CloudFront, the calls will be correctly routed.
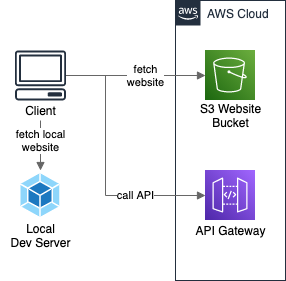
While this will work for the deployed application, we also need some solution for local development. There we usually have only the website running on localhost, and we call remote (hosted) development API. We can solve this with different environment files for local and production environments:
- with Angular: using environment files
- with React: using built-in support for dotenv files
- with webpack: using dotenv-webpack plugin
For production, we specify /api as a base path, and locally – full URL of the API.
Need for specified parameters
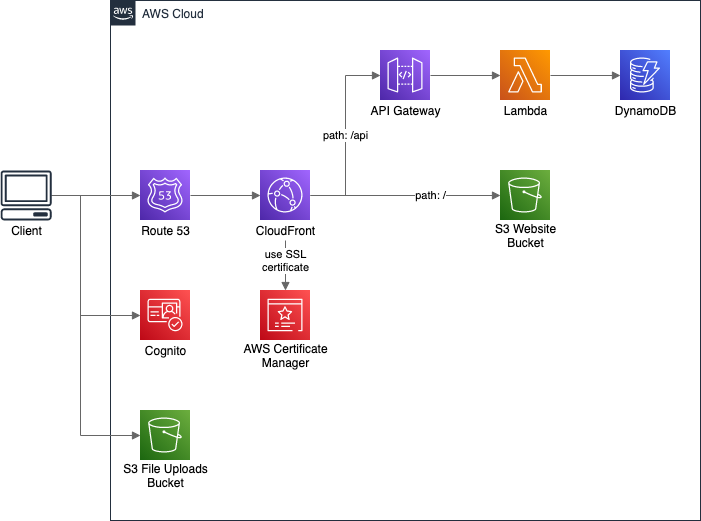
While the above solution works pretty well for simple needs, sometimes it’s not enough. We may want to call more than a simple backend API. For example, we may be using:
- Amazon Cognito for user authentication, where we need a set of User Pool parameters,
- direct file upload to S3 Bucket, where we need the bucket name,
- API Gateway or AppSync not exposed by CloudFront, where we need API URL.
As we see, we need to provide our frontend app a set of different parameters.
Drawbacks of hardcoding values
One obvious solution would be to hardcode parameter values in website sources. That is always a bad idea. The code becomes non-portable between environments. We must change parameters manually for each stage (i.e. prod, test), and each developer must either use the same common environment or change all parameters by hand to reference his own environment.
Another drawback of hardcoding values is, well, we have to obtain them before hardcoding. When we deploy the application to a new environment, we need to create all the backend resources at first. Only then we can get parameter values and put them in the website sources. That is not how a proper deployment process looks like. It should be a single action, execution of one command, to have the whole new environment working.
Deployment-time resolved website parameters
Knowing all of the above, the goal is to have a deployment configuration that gives us:
- deployment of all resources, including the website, with one command
- ability to create independent environments
- frontend application always referencing its own environment resources
- local website development with out-of-the-box values for the backend resources parameters
To simplify the example, the stack we create will contain only the S3 Bucket hosting the website and the API Gateway with a single mocked endpoint.
AWS stack deployment with website upload
Since the example here is about AWS, the first two points can be easily achieved with the Serverless Framework. Creating independent environments is a built-in feature with stage parameter. Full deployment is done with serverless deploy command. The website is uploaded to S3 Bucket using serverless-s3-deploy
plugin, every time the stack is (re)deployed.
service: parameters

plugins:
  - serverless-s3-deploy
  - serverless-s3-remover

custom:
  assets:
    auto: true
    targets:
      # copy website to S3 bucket on service deployment
      - bucket: !Ref WebsiteBucket
        files:
          - source: dist
            empty: true
            globs: '**/*'

  remover:
    buckets:
      # empty the website S3 bucket content when removing the service so the bucket can be removed
      - ${cf:${self:custom.baseName}.WebsiteBucketName, ''}

provider:
  name: aws
  stage: ${opt:stage, 'dev'}

functions:
  hello:
    handler: handler.hello
    events:
      - http:
          path: hello
          cors: true
          method: GET
          integration: mock
          request:
            template:
              application/json: '{"statusCode": 200}'
          response:
            template: '{"greeting": "Hello Parametrized Website!"}'
            statusCodes:
              200:
                pattern: ''

resources:
  Resources:

    WebsiteBucket:
      Type: AWS::S3::Bucket
      Properties:
        WebsiteConfiguration:
          IndexDocument: index.html

    WebsiteBucketPolicy:
      Type: AWS::S3::BucketPolicy
      Properties:
        Bucket: !Ref WebsiteBucket
        PolicyDocument:
          Statement:
            - Effect: Allow
              Action:
                - s3:GetObject
              Resource: !Sub 'arn:aws:s3:::${WebsiteBucket}/*'
              Principal: '*'

  # save bucket name in outputs so it can be found when removing the service
  Outputs:
    WebsiteBucketName:
      Value: !Ref WebsiteBucket
Obtaining environment parameters from stack
The trick is to retrieve parameters of just deployed stack and include them on the website before it’s uploaded. To do this, and to trigger website build, we will use serverless-scriptable-plugin. It allows attaching custom actions to the deployment process.
We will execute two commands after the stack is updated, but before the website is uploaded:
- our own JS script, that will fetch parameters from just deployed stack and save them as config file in website resources
- webpack build to bundle website resources
custom:

  # ...

  scriptHooks:
    after:aws:deploy:deploy:updateStack:
      - generateConfigFile.js
      - webpack --mode production --progress
Depending on the tools and framework we use, instead of calling webpack, we may execute any other command to build our website.
JS script has access to the serverless object and we can get some parameters from it, like the stage or stack name.
Having this, we can use the AWS SDK to get details from the actual deployed CloudFormation stack.
Our mock API Gateway is created by the Serverless Framework, which automatically adds API base URL to the stack outputs
under the name ServiceEndpoint. So that’s from where we need to obtain it.
'use strict';

/*
 * Obtains parameters from deployed stack resources
 * and saves them as JSON file.
 */

const fs = require('fs');

const provider = serverless.service.provider;
const awsProvider = serverless.getProvider('aws');

const listStackOutputs = async () => {
    const response = await awsProvider.request('CloudFormation', 'describeStacks', {
        StackName: awsProvider.naming.getStackName(),
    });

    return response.Stacks[0].Outputs;
}

const createConfig = stackOutputs => ({
    env: provider.stage,
    apiUrl: getOutputValue(stackOutputs, 'ServiceEndpoint'),
});

const getOutputValue = (stackOutputs, outputKey) => {
    return stackOutputs.find(o => o.OutputKey === outputKey).OutputValue || '';
};

const writeConfigFile = config => {
    fs.writeFileSync('./src/config.json', JSON.stringify(config));
};

listStackOutputs()
    .then(createConfig)
    .then(writeConfigFile);
For more complex example check out the Cognito parameters retrieval for protected Swagger UI website.
Reading parameters in website
With the config file generated and placed along with the frontend application sources, we can easily read it in the website code. JSON files can be imported directly to JavaScript/TypeScript. This little helper file does it and provides us a typed config value.
import configFile from './config.json';

export const config = configFile as Config;

export interface Config {
    env: string;
    apiUrl: string;
}
Parameters for local development
The final requirement was the ability to use our deployed environment while running the website locally. To do this we only need to deploy our environment once. Doing that will create the config file in our website sources. From now on we can just launch local dev server and the local website will use our deployed environment resources.
Security note
Treat parameters you pass to or include in frontend application as public. They can be easily read by anyone. Never pass any secret tokens and keys to it.
The config.json file should be listed in the .gitignore and not being committed to the repository.
It’s less about the security of the parameters, which are, as stated before, public.
It’s just about the file being autogenerated and different for each environment.
Such resources should not be a part of the repository.
Derived implementations
Writing config file during the deployment is the base idea. Implementation details may vary depending on the needs. Here are some alternatives:
- Not using bundler (like webpack)?
- Fetch
/config.jsonfile at the beginning of the JS code. - Instead of
config.json, produce JS file that exports config object. Load it inindex.htmllike any other JavaScript file. - Want to use dotenv files (or any other format) instead of JSON?
- Customize output format in the
generateConfigFile.jsscript and config read in website sources.
Also, despite the example being about the AWS and using Serverless Framework, the same can be achieved in basically any other architecture and/or toolset.
Final thoughts
Presented here approach for generating environment parameter values does not limit to websites and AWS solutions. It’s quite a popular task, especially for frontend developers, that too often is not automated.
Even if we need to provide parameters only once, at the beginning of the work with the project, and we don’t change them often, automating it has big value. It allows us to quickly deploy a new, separate environment when it’s needed. It also makes it much easier for new developers to join the project. They should run a single command to have everything working and spend time getting familiar with the project, not fighting with configuring something they don’t yet know.
As with every automation, it’s an investment that returns in the future. Here the investment is small and quick but thank’s to it further work with multiple environments is faster and less distractive.
See the full solution code in the GitHub repository:
- 📨 algorithm-independent information about new posts
- 📘 my ebook about Serverless on AWS
- ✅ zero spam
Unsubscribe anytime.
Unsubscribe anytime.