- Productionizing ML solutions on AWS
- Serverless ML pipeline architecture
- Python, the obvious choice
- Why not SageMaker Serverless?
- Generating image captions with Machine Learning
- Python libraries
- Pre-trained model
- Lambda code
- Overcoming Lambda size limitations
- Lambda Docker image
- Importance of Dockerfile commands order
- Provisioning ML pipeline with CDK
- Adjusting Lambda memory and CPU for Machine Learning
- Deploying the CDK stack
- Testing serverless image captions generation
- Minimizing serverless ML pipeline latency
- Optimizing cold starts
- Storing files on EFS
- Initializing ahead of time with provisioned concurrency
- Reducing concurrent cold starts
- Summary and lessons learned
Yes, you can run Machine Learning models on serverless, directly with AWS Lambda. I know because I built and productionized such solutions. It’s not complicated, but there are a few things to be aware of. I explain them in this in-depth tutorial, where we build a serverless ML pipeline.
As always, the link to the complete project on GitHub is at the end of the post.
Productionizing ML solutions on AWS
There is a wide variety of advanced ML models available on the internet. You can download and use them with just a few lines of code in a high-level ML library. But there is a gap between running amazing models locally and productionizing their usage.
Here comes serverless, allowing you to run your models in the cloud as simply as you do ad-hoc jobs locally and build event-driven ML pipelines without managing any infrastructure components. And, of course, all that while paying only for what you actually use, not for some virtual machines waiting idly for work.
But there must be some troubles along the way. Otherwise, I would not have to write this post.
The number one problem we face with running ML models is the size of the dependencies. Both ML models and libraries are huge. The other thing to consider is latency – loading the model into memory takes time. But we can tackle both those issues.
So let’s build a serverless Machine Learning pipeline. We just need some use-case. How about automatically generating captions for uploaded images?
Serverless ML pipeline architecture
Our objective is simple: generate a caption for each uploaded image. That’s complex enough to make it a real-life example while keeping the tutorial concise.
The starting point of our pipeline is an S3 bucket. When we upload images to it, the bucket will send notifications about new objects to the Lambda function. There we do the Machine Learning magic and save the generated caption in the DynamoDB table.
We will define the infrastructure with AWS CDK, my preferred Infrastructure as a Code tool. Once we declare the infrastructure, the CDK will use the CloudFormation to deploy the needed resources.

Python, the obvious choice
For Machine Learning, Python is the default language of choice. So this is also our choice for the Lambda function.
AWS CDK also supports Python, so it makes perfect sense to use it to define the infrastructure and keep the project uniform.
Why not SageMaker Serverless?
Amazon SageMaker is a Swiss Army knife for Machine Learning. But I don’t mean the handy pocket version. Rather something like this:

With SageMaker Serverless Inference, you can deploy and use an ML model, paying only for the actual usage. However, it runs on AWS Lambda under the hood, bringing the same limitations – like the lack of the GPU.
At the same time, introducing SageMaker adds complexity to:
- the architecture – adding another service to our pipeline and calling it from the Lambda function,
- the deployment process – preparing and deploying the model to SageMaker,
- and the code – using the SageMaker library.
While the advantages of using SageMaker libraries and tooling could be significant in some scenarios, we intend to use pre-trained models and high-level libraries that will be entirely sufficient on their own.
Generating image captions with Machine Learning
Let’s start with the Lambda function code that will be the heart of our pipeline.
Python libraries
We will use an existing model from 🤗 Hugging Face. It’s a platform containing pre-trained ML models for various use cases. It also provides Transformers – a high-level ML library making using those models dead simple. So simple that even I can use it.
For dependency management, we will use Poetry. Why not pip? Because Poetry is better in every aspect.
poetry add boto3 transformers[torch] pillow
boto3 is an AWS SDK for Python. We will need it to communicate with S3 and DynamoDB from the Lambda function.
Then we add the Hugging Face transformers library mentioned above, specifying it should also install the PyTorch
ML framework it will use under the hood.
And finally, we need the Pillow library for image processing.
Pre-trained model
As I mentioned, we will use an existing, pre-trained model that does exactly what we need: nlpconnect/vit-gpt2-image-captioning from Hugging Face. We just need to download it.
Because the pre-trained model is large, around 1 GB, we need a Git LFS extension installed to download it. Then we run:
git lfs install
git clone https://huggingface.co/nlpconnect/vit-gpt2-image-captioning
Lambda code
The Lambda code is just 51 lines (and I put blank lines generously!).
import os
from io import BytesIO

import boto3
from PIL import Image
from transformers import VisionEncoderDecoderModel, ViTFeatureExtractor, AutoTokenizer

s3 = boto3.client("s3")

dynamodb = boto3.resource("dynamodb")
captions_table = dynamodb.Table(os.environ["TABLE_NAME"])

model = VisionEncoderDecoderModel.from_pretrained("./vit-gpt2-image-captioning")
feature_extractor = ViTFeatureExtractor.from_pretrained("./vit-gpt2-image-captioning")
tokenizer = AutoTokenizer.from_pretrained("./vit-gpt2-image-captioning")


def handler(event, context) -> None:
    bucket = event.Records[0].s3.bucket.name
    key = event.Records[0].s3.object.key

    image = load_image(bucket, key)

    caption = generate_caption(image)

    persist_caption(key, caption)


def load_image(bucket: str, key: str) -> Image:
    file_byte_string = s3.get_object(Bucket=bucket, Key=key)["Body"].read()
    image = Image.open(BytesIO(file_byte_string))

    if image.mode != "RGB":
        image = image.convert(mode="RGB")

    return image


def generate_caption(image: Image) -> str:
    pixel_values = feature_extractor(images=[image], return_tensors="pt").pixel_values

    output_ids = model.generate(pixel_values, max_length=16, num_beams=4)

    return tokenizer.batch_decode(output_ids, skip_special_tokens=True)[0].strip()


def persist_caption(key: str, caption: str) -> None:
    captions_table.put_item(Item={
        "key": key,
        "caption": caption,
    })
Firstly, in lines 8-11, we create boto3 clients to interact with S3 and DynamoDB.
For DynamoDB, we need the table name we will pass to the Lambda function as an environment variable.
Then we load the previously downloaded ML models (lines 13-15).
We do both those things outside the handler method. Therefore this code will be executed only once, when the Lambda environment is created, not on every Lambda execution. This is critical, as loading models takes quite a long. We will look at it in more detail a bit later.
Further, we have the handler method. The handler is called on Lambda invocation. The event we receive contains the details on the newly created S3 object, and we extract the bucket name and the object key from it.
Then, we do three simple steps:
- Fetch the image from the S3 bucket.
- Use the previously loaded ML models to understand the image content and generate a caption.
- Save the caption in the DynamoDB table.
Overcoming Lambda size limitations
If we package our code right now, with libraries and model, and upload it to Lambda with a Python environment, we will get an error. The package size limit is 250 MB. Our package is… around 3 GB.
The 250 MB limit includes Lambda layers, so they are not a solution here.
So what is the solution? Bundling it as a Docker image instead. The Docker image size limit for Lambda is 10 GB.
Lambda Docker image
We will use a multi-stage build for the Docker image to omit build dependencies in our target image.
FROM public.ecr.aws/docker/library/python:3.9.15-slim-bullseye AS build

WORKDIR /root

RUN apt-get update && apt-get install -y \
    curl \
    git \
    git-lfs

RUN curl -sSL https://install.python-poetry.org | python3 -
ENV PATH="/root/.local/bin:$PATH"

RUN git lfs install
RUN git clone --depth=1 https://huggingface.co/nlpconnect/vit-gpt2-image-captioning
RUN rm -rf vit-gpt2-image-captioning/.git

COPY pyproject.toml poetry.lock ./
RUN poetry export -f requirements.txt --output requirements.txt

########################################

FROM public.ecr.aws/lambda/python:3.9.2022.10.26.12

COPY --from=build /root/vit-gpt2-image-captioning ./vit-gpt2-image-captioning

COPY --from=build /root/requirements.txt ./
RUN pip3 install -r requirements.txt --target "$LAMBDA_RUNTIME_DIR"

COPY main.py ./

CMD ["main.handler"]
In the first stage, build, we install curl, Git, Git LFS, and Poetry.
Then we download the nlpconnect/vit-gpt2-image-captioning model from the 🤗 Hugging Face, just as we previously did it locally.
Finally, we use Poetry to generate a requirements.txt file with our production Python dependencies.
Then we use the official Docker image for Lambda with Python.
Firstly, we copy the ML model fetched in the build stage and the requirements.txt file.
Next, we install Python dependencies with pip and copy the sources of our Lambda function – the Python code we wrote above.
Finally, we instruct that our Lambda handler is the handler method from the main.py file.
Importance of Dockerfile commands order
The order of operations in our Dockerfile is essential.
Each command creates a cacheable layer. But if one layer is changed, all the next are rebuilt.
That’s why we want to have the largest and least frequently changed layers first and the ones changed more often last. So in our image, we have, in order:
- ML model
- Python libraries
- Lambda code
When we change the Lambda code, only that last layer is updated. That means no time-consuming operations like fetching ML model or Python libraries happens on every code update. Also, when making changes and deploying the Docker image, only that last, thin layer will be uploaded every time, not the full 3 GB image.
Provisioning ML pipeline with CDK
Now we need to provision AWS infrastructure. It’s a simple CDK Stack with three constructs – the DynamoDB table, Lambda function, and S3 bucket.
Setting up the CDK project from scratch is out of the scope of this tutorial, but you can find the complete source in the GitHub project repository at the end of the post. Here is the essential – MLStack that contains our resources.
from aws_cdk import Stack, RemovalPolicy, Duration
from aws_cdk.aws_dynamodb import Table, BillingMode, Attribute, AttributeType
from aws_cdk.aws_lambda import DockerImageFunction, DockerImageCode
from aws_cdk.aws_logs import RetentionDays
from aws_cdk.aws_s3 import Bucket, EventType
from aws_cdk.aws_s3_notifications import LambdaDestination
from constructs import Construct


class MLStack(Stack):

    def __init__(self, scope: Construct, construct_id: str, **kwargs) -> None:
        super().__init__(scope, construct_id, **kwargs)

        captions_table = Table(
            self, "CaptionsTable",
            removal_policy=RemovalPolicy.DESTROY,
            billing_mode=BillingMode.PAY_PER_REQUEST,
            partition_key=Attribute(name="key", type=AttributeType.STRING),
        )

        captioning_lambda = DockerImageFunction(
            self, "CaptioningLambda",
            code=DockerImageCode.from_image_asset("./captioning_lambda/"),
            memory_size=10 * 1024,
            timeout=Duration.minutes(5),
            log_retention=RetentionDays.ONE_MONTH,
            environment={
                "TABLE_NAME": captions_table.table_name,
            }
        )

        captions_table.grant_write_data(captioning_lambda)

        images_bucket = Bucket(
            self, "ImagesBucket",
            removal_policy=RemovalPolicy.DESTROY,
            auto_delete_objects=True,
        )
        images_bucket.add_event_notification(EventType.OBJECT_CREATED, LambdaDestination(captioning_lambda))
        images_bucket.grant_read(captioning_lambda)
The DynamoDB table definition is pretty simple. It’s just a table with on-demand billing.
The S3 bucket is not complicated as well. We add an event notification rule to it to invoke Lambda for every new object created in the bucket.
We also add proper permissions to Lambda to access the DynamoDB table and S3 bucket.
For the Lambda function, we use the DockerImageFunction construct.
We point to the Dockerfile location for the source code, and the CDK will handle building the Docker image.
Adjusting Lambda memory and CPU for Machine Learning
ML libraries require a lot of memory, partially because they need to load huge ML models. Here we set the maximum possible memory size for the Lambda – 10 GB. However, our model does not require this much – 5 GB would be enough.
But the amount of allocated memory translates to the allocated CPU power. That’s why adding more memory is the first step for optimizing Lambda functions.
ML operations are compute-expensive. In Lambda, without GPU, everything is done on the CPU. Therefore, the more CPU power is available, the faster our function will work.
On the other hand, remember that increasing the memory allocation also increases Lambda invocation cost. So with heavy usage, it’s worth finding the best balance between the execution speed and costs. I detailed how to do this in my Lambda performance optimization post.
Deploying the CDK stack
With CDK CLI installed, the deployment is as simple as running:
cdk deploy
When we run the deployment for the first time, the CDK will build and upload our Lambda function Docker image. It can take a couple of minutes, requiring fetching gigabytes from the internet and then uploading it to AWS. But consecutive deployments, if we modify only the Lambda code, will be much faster thanks to the image layers cache described before.
Testing serverless image captions generation
After uploading several images to the S3 bucket and checking the DynamoDB table after a moment, we see the automatically generated captions:
 |  |  |
|---|---|---|
| “a little girl standing on the side of a road holding a camera" | "a giraffe crossing a road next to a car" | "a woman sitting on a bed reading a book” |
Quite good!
Minimizing serverless ML pipeline latency
Now, let’s look at the latency.
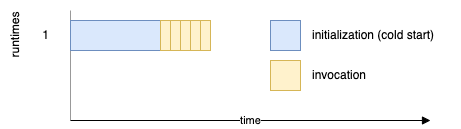
During the first Lambda function invocation, it goes through a cold start. First, AWS fetches the Docker image, provisions the environment, and executes everything we have outside the handler method. Only then is Lambda ready to handle the event.
The same happens after every Lambda update or after it’s inactive (not called) for some time.
Here is a sample invocation with cold start traced with AWS X-Ray:
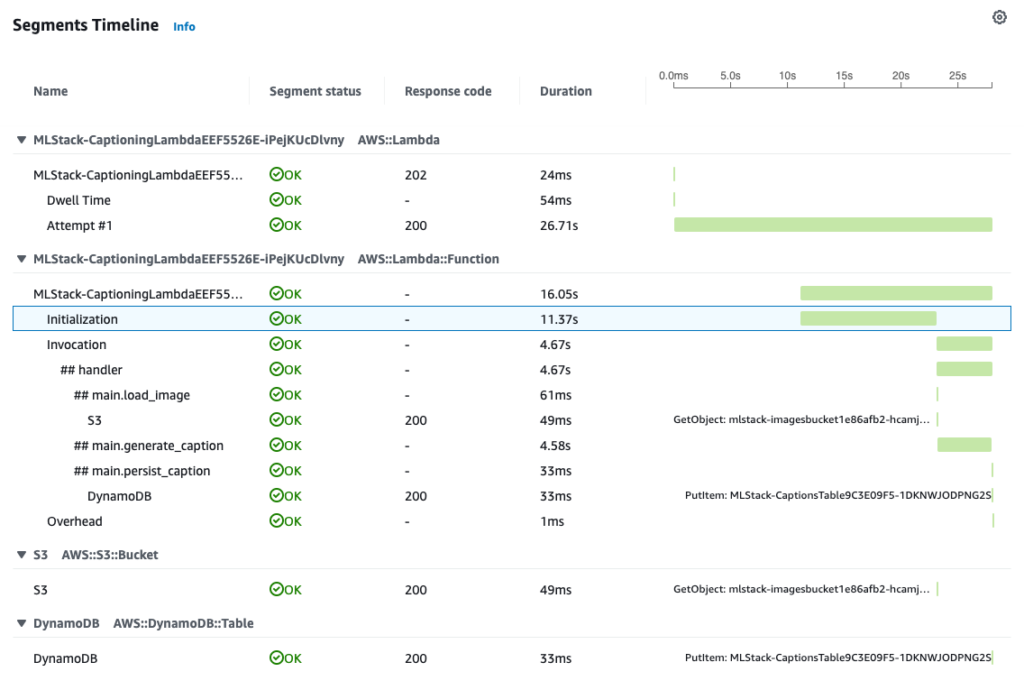
Cold start – highlighted Initialization segment – took 11.4s.
From the additional logs, I know that 10s of it was loading the ML models (lines 13-15 of the Lambda code).
Then, the longest part of the invocation was generating the caption, which took almost 2s.
On the consecutive runs, there is no cold start (Initialization) part, so the entire execution ends in less than 3s.
Here are the measured times for other cold start invocations:
| initialization total | loading models |
|---|---|
| 11.4s | 10.0s |
| 52.3s | 17.6s |
| 16.0s | 14.6s |
| 17.6s | 16.3s |
| 2m27s | 2m15s |
| 10.7s | 9.5s |
| 11.3 | 10.0s |
| 9.5s | 8.3s |
As you can see, while the cold start was usually under 20 seconds, occasionally, it took much longer. Even more than 2 minutes. This variety is something I observe with large Docker images and CPU-intensive initializations, typical for ML workloads. But it’s due to AWS internals and is not something we can improve ourselves.
Optimizing cold starts
Contrary to popular belief, cold starts are not so big of a problem. They happen rarely:
- on the initial invocation,
- when the invocations count increases and Lambda scales up to accommodate for it,
- after the function was not invoked for some time and AWS freed allocated resources.
On production systems, cold starts can affect less than 0.1% of invocations.
But if you need, what can you do about them?
Storing files on EFS
One option I tried in the past is using EFS. It’s a file system that you can attach to the Lambda function. By putting large Python libraries and ML models there, you no longer deal with a large deployment package. Therefore you can use the native Python Lambda runtime instead of the Docker image. And smaller bundle and native Lambda runtime give lower cold start latency.
But in our case, most of the cold start time is not a result of fetching large Docker image but loading the ML model into memory. And EFS does not solve this part.
Instead, EFS introduces several complications. First, you need an EC2 instance to put the files on EFS. There is no easy way to deploy files to EFS during the deployment. And additionally, you must put your Lambda in a VPC to attach the EFS.
Altogether, the drawbacks of using EFS in this scenario heavily outweigh the benefits.
Initializing ahead of time with provisioned concurrency
The more comprehensive solution for Lambda cold starts is to use provisioned concurrency. It’s basically like asking AWS to keep the given number of function runtimes active for us.
Provisioned function initialization happens during the deployment. As a result, after the deployment completes, our Lambda function is ready to handle events – without a cold start.
However, provisioned concurrency incurs costs for the number of runtimes we require active, regardless of whether the Lambda is invoked. Also, keep in mind that if there are more events in the queue than already provisioned functions can handle at once, Lambda will create new environments – with cold starts.
Provisioned concurrency is a good solution for client-facing ML Lambdas, where we cannot allow the 20 secs cold start. Nonetheless, for asynchronous processes, like in our case, it’s most often a waste of money.
To setup provisioned concurrency, you need to create a Lambda alias and set the number of provisioned concurrent executions you want it to set up:
captioning_lambda.add_alias(
	"live",
	provisioned_concurrent_executions=1,
)
Reducing concurrent cold starts
If we upload five images to the S3 bucket at once, then, due to a long cold start, we will see five separate Lambda runtimes created, each to handle one invocation. Of course, assuming there are no “hot” runtimes of our Lambda function already existing.

That may or may not be what we want. But with such a disproportionally huge cold start to the invocation length, having just a single runtime provisioned and handling all the invocations would not take much longer. And we pay for the initialization time of the Docker-based runtimes.
So sometimes, if we know a limited number of runtimes is enough and our workloads come in batches (like by uploading multiple images to our bucket simultaneously), it may be wise to limit the number of runtimes Lambda can create. We do this by setting the reserved concurrency for Lambda. In CDK, it’s the reserved_concurrent_executions property of the Lambda function construct.
For example, with reserved concurrency set to 1, Lambda will create only a single runtime environment. All events will be queued on the Lambda internal queue and executed one by one.
Of course, we need to ensure that the workload won’t be bigger than the throughput of our Lambda. If we keep uploading more images than the set number of runtimes can process, the queue will continue to grow. Eventually, events that won’t be processed in 6 hours (by default) will get dropped.
Summary and lessons learned
Well, that is quite a long post. But I wanted it to reflect real-life objectives and considerations, so I went into detail. I hope it will be helpful for you.
Let’s recap.
Nowadays, we can fetch pre-trained Machine Learning models for various cases from the internet and use them in a few lines of code. That’s great. However, if you have more ML experience, using smaller, more specialized libraries instead of high-level ones could benefit both initial deployment times and cold starts. However, libraries’ size is not the biggest problem, so that’s optional.
No matter what Python libraries we choose, ML models are usually at least 1 GB in size anyway. That means we need to use Docker image instead of native Lambda runtimes. But that’s okay. If we order commands in the Dockerfile correctly, only the first image build and upload will take a long time. Consecutive ones will take seconds, as we will only update the last image layer containing our code.
The ML Lambda functions require a generous amount of memory assigned for two reasons. Firstly, ML libraries load models into memory, so too low memory will result in out-of-memory errors. Secondly, Lambda scales the CPU with the memory, and ML operations are CPU-intensive. Therefore, the more CPU power there is the lower latency of our function.
Initializing ML libraries with models increases the cold start, which can take a significant amount of time. If the ML pipeline is an asynchronous process, that’s probably not an issue. Cold starts happen only from time to time. But it may be worth paying extra for the Lambda provisioned concurrency in a client-facing ML Lambdas, where we cannot allow such long cold starts.
And finally, due to the long cold starts, limiting the number of Lambda runtimes created with reserved concurrency settings may be good if our workloads come in batches.
With both provisioned concurrency and reserved concurrency, we should pay extra attention to proper monitoring.
You can find the complete source for this project on GitHub:
- 📨 algorithm-independent information about new posts
- 📘 my ebook about Serverless on AWS
- ✅ zero spam
Unsubscribe anytime.
Unsubscribe anytime.