- Off-site backup for personal files
- Backup to S3 script
- Prerequisites
- Provision AWS resources
- Deploy stack
- Get bucket name
- Get access key
- Setup rclone
- Backup to S3
- Single file backup
- Directory backup
- Subdirectories backup
- Example
- Questions and answers
- Why IAM user?
- Why .tar.gz archives?
- Why stream archive?
- Why calculating hash?
- Why rclone?
- Why S3 Glacier Flexible Retrieval?
- Problems and considerations
- Automatic backups
- Backup from Google Photos (and similar)
- Disk operations vs power-saving mode
- Backblaze – an easy alternative
- Conclusion
In need to backup my personal files in the cloud, I wrote a script that archives the data into the Amazon S3 bucket. After some fine-tuning and solving a bunch of edge-cases, it’s limited mainly by the disk read and my internet upload speed. And it costs me only $3.70 per TiB per month.
Instead of reinventing the wheel, I started with research. There must be a good, easy-to-use cloud backup service, right? But everything I found was too complex and/or expensive. So I wrote down the backup script myself.
Then I did the research again, and the results were quite different – this time, I found a few reasonable services I could use. But I already had the script, I had fun writing it, I will continue using it, so I decided to share it.
Off-site backup for personal files
The question about the personal backup system is raised from time to time on Hacker News. On the internet, you can find a 3-2-1 backup strategy:
- 3 copies
- on 2 different media
- with at least 1 copy off-site
I have an external disk with documents and photos archive. This, however, is just one copy kept right next to my laptop. And hard drives fail.
So I needed an off-site backup.
Looking for personal cloud backup solutions, I found some overcomplicated, some expensive, and one or two reasonable services. But then I remembered that I work on AWS, and Amazon S3 storage is cheap. This is especially true if you want to archive data and don’t touch it too often.
The result is the script I wrote for backing up files to the S3 bucket.
Backup to S3 script
Below is the full, detailed explanation. If you are interested only in the script and usage instructions, you can find the link to the GitHub repository at the end.
Prerequisites
The script uses rclone and GNU Parallel.
On macOS, you can install them with Homebrew:
brew install rclone parallel
Provision AWS resources
To store backups in an S3 bucket, you need to have such a bucket. And while you could create and configure it by hand, it will be easier to provision it with a simple CloudFormation template.
AWSTemplateFormatVersion: 2010-09-09

Resources:

  BackupBucket:
    Type: AWS::S3::Bucket
    Properties:
      PublicAccessBlockConfiguration:
        BlockPublicAcls: true
        IgnorePublicAcls: true
        BlockPublicPolicy: true
        RestrictPublicBuckets: true
      OwnershipControls:
        Rules:
          - ObjectOwnership: BucketOwnerEnforced
      VersioningConfiguration:
        Status: Enabled
      LifecycleConfiguration:
        Rules:
          - Id: AbortIncompleteMultipartUpload
            Status: Enabled
            AbortIncompleteMultipartUpload:
              DaysAfterInitiation: 3
          - Id: NoncurrentVersionExpiration
            Status: Enabled
            NoncurrentVersionExpiration:
              NewerNoncurrentVersions: 3
              NoncurrentDays: 30

  BackupUser:
    Type: AWS::IAM::User
    Properties:
      Policies:
        - PolicyName: s3-access
          PolicyDocument:
            Version: "2012-10-17"
            Statement:
              - Effect: Allow
                Action:
                  - 's3:*MultipartUpload*'
                  - 's3:ListBucket'
                  - 's3:GetObject'
                  - 's3:PutObject'
                Resource:
                  - !Sub '${BackupBucket.Arn}'
                  - !Sub '${BackupBucket.Arn}/*'

Outputs:

  BackupBucketName:
    Value: !Ref BackupBucket

  BackupUserName:
    Value: !Ref BackupUser
The template defines two resources: the BackupBucket and BackupUser.
The BackupBucket has disabled public access for all the objects, as you don’t want any of the files to be publicly accessible by mistake.
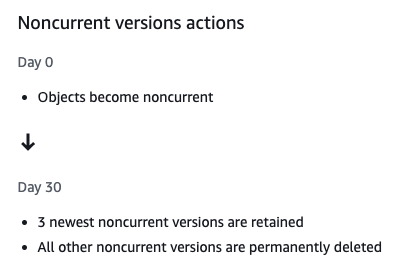
It also enables object versioning. When uploading new versions of existing files – fresh backups of the same files – the previous ones will be kept instead of immediately overridden.
On the other hand, to not keep old backups indefinitely (and pay for them), the bucket has a lifecycle rule that automatically removes old file versions. It will keep only the last 3 versions and remove others 30 days after they become “older”.
The other lifecycle rule aborts incomplete files uploads after 3 days. The script will upload big files in multiple chunks. If the process fails or is interrupted, you are still charged for the uploaded chunks until you complete or abort the upload. This rule will prevent those incomplete uploads from staying forever and generating charges.
The second created resource is the BackupUser. It’s an IAM user with permission to upload files to the bucket.
Deploy stack
To deploy the stack, run:
aws cloudformation deploy --stack-name backupToS3 --template-file stack.yml --capabilities CAPABILITY_IAM
Get bucket name
After the deployment is completed, go to the CloudFormation in the AWS Console and find the backupToS3 stack.
Then, in the “Outputs” tab, you will see the BackupBucketName key with the generated S3 bucket name.
You will need it in a moment.
Get access key
Similarly, you will find the BackupUserName with the IAM user name.
Go to the IAM, open that user details, and create an access key in the “Security credentials” tab.
Setup rclone
rclone requires setting up the storage backend upfront.
You can do this by running rclone config and setting up the S3
or manually editing the configuration file.
In the configuration, set the access key ID and secret access key generated for the IAM user.
[backup]
type = s3
provider = aws
env_auth = false
access_key_id = xxxxxx
secret_access_key = xxxxxx
acl = private
region = eu-west-1
Backup to S3
Generally, the idea is straightforward: we copy everything to the S3 bucket.
But things are rarely so simple. So let’s break it down, step by step.
The script is based on the minimal Bash script template. Bash provides the easiest way to glue together various CLI programs and tools.
#!/usr/bin/env bash

set -Eeuo pipefail

usage() {
  # omitted for brevity
  exit
}

parse_params() {
  split_depth=0
  max_size_gb=1024
  storage_class="GLACIER"
  dry_run=false

  while :; do
    case "${1-}" in
    -h | --help) usage ;;
    -v | --verbose) set -x ;;
    -b | --bucket) bucket="${2-}"; shift ;;
    -n | --name) backup_name="${2-}"; shift ;;
    -p | --path) root_path="${2-}"; shift ;;
    --max-size) max_size_gb="${2-}"; shift ;;
    --split-depth) split_depth="${2-}"; shift ;;
    --storage-class) storage_class="${2-}"; shift ;;
    --dry-run) dry_run=true ;;
    -?*) die "Unknown option: $1" ;;
    *) break ;;
    esac
    shift
  done

  [[ -z "${bucket-}" ]] && die "Missing required parameter: bucket"
  [[ -z "${backup_name-}" ]] && die "Missing required parameter: name"
  [[ -z "${root_path-}" ]] && die "Missing required parameter: path"

  return 0
}

main() {
  root_path=$(
    cd "$(dirname "$root_path")"
    pwd -P
  )/$(basename "$root_path") # convert to absolute path

  # division by 10k gives integer (without fraction), round result up by adding 1
  chunk_size_mb=$((max_size_gb * 1024 / 10000 + 1))

  # common rclone parameters
  rclone_args=(
    "-P"
    "--s3-storage-class" "$storage_class"
    "--s3-upload-concurrency" 8
    "--s3-no-check-bucket"
  )

  if [[ -f "$root_path" ]]; then
    backup_file "$root_path" "$(basename "$root_path")"
  elif [[ "$split_depth" -eq 0 ]]; then
    backup_path "$root_path" "$(basename "$root_path")"
  else
    traverse_path .
  fi
}

parse_params "$@"
main
The script expects at least three parameters: the S3 bucket name (--bucket), the backup name (--name), and the local path to be backed up (--path). The backup name serves as an S3 prefix to separate distinct backups.
After parsing the input arguments, the script does four things.
Firstly, it converts the path to absolute.
Secondly, it calculates the chunk size for the multipart file upload based on the max archive size. More on this later.
Thirdly, it creates an array of common parameters for rclone.
And finally, it executes backup based on the provided arguments.
Single file backup
If the backup path points to a file, the script uses the rclone copy command to simply upload the file to the bucket.
# Arguments:
# - path - absolute path to backup
# - name - backup file name
backup_file() {
  local path=$1
  local name=$2

  msg "⬆️ Uploading file $name"

  args=(
    "-P"
    "--checksum"
    "--s3-storage-class" "$storage_class"
    "--s3-upload-concurrency" 8
    "--s3-no-check-bucket"
  )
  [[ "$dry_run" = true ]] && args+=("--dry-run")

  rclone copy "${args[@]}" "$path" "backup:$bucket/$backup_name"
}
rclone will calculate an MD5 of the file and upload it only if a file with the same name and checksum does not yet exist. This will prevent wasting time uploading the file if it’s unmodified from the last time you backed it up.
Directory backup
If the path points to a directory, things get more complex.
# Arguments:
# - path - absolute path to backup
# - name - backup name, without an extension, optionally being an S3 path
# - files_only - whether to backup only dir-level files, or directory as a whole
backup_path() {
  (
    local path=$1
    local name=$2
    local files_only=${3-false}

    local archive_name files hash s3_hash

    path=$(echo "$path" | sed -E 's#(/(\./)+)|(/\.$)#/#g' | sed 's|/$||')     # remove /./ and trailing /
    archive_name=$(echo "$backup_name/$name.tar.gz" | sed -E 's|/(\./)+|/|g') # remove /./

    cd "$path" || die "Can't access $path"

    if [[ "$files_only" == true ]]; then
      msg "🔍 Listing files in \"$path\"..."
      files=$(find . -type f -maxdepth 1 | sed 's/^\.\///g')
    else
      msg "🔍 Listing all files under \"$path\"..."
      files=$(find . -type f | sed 's/^\.\///g')
    fi

    # sort to maintain always the same order for hash
    files=$(echo "$files" | LC_ALL=C sort)

    if [[ -z "$files" ]]; then
      msg "🟫 No files found"
      return
    fi

    files_count=$(echo "$files" | wc -l | awk '{ print $1 }')
    msg "ℹ️ Found $files_count files"

    if [[ "$files_only" == true ]]; then
      msg "#️⃣ Calculating hash for files in path \"$path\"..."
    else
      msg "#️⃣ Calculating hash for directory \"$path\"..."
    fi

    # replace newlines with zero byte to distinct between whitespaces in names and next files
    # "md5sum --" to signal start of file names in case file name starts with "-"
    hash=$(echo "$files" | tr '\n' '\0' | parallel -0 -k -m md5sum -- | md5sum | awk '{ print $1 }')
    msg "ℹ️ Hash is: $hash"

    s3_hash=$(aws s3 cp "s3://$bucket/$archive_name.md5" - 2>/dev/null || echo "")

    if [[ "$hash" == "$s3_hash" ]] && aws s3api head-object --bucket "$bucket" --key "$archive_name" &>/dev/null; then
      msg "🟨 File $archive_name already exists with the same content hash"
    else
      msg "⬆️ Uploading file $archive_name"

      if [[ "$dry_run" != true ]]; then
        echo "$files" | tr '\n' '\0' | xargs -0 tar -zcf - -- |
          rclone rcat -P \
            --s3-storage-class "$storage_class" \
            --s3-chunk-size "${chunk_size_mb}Mi" \
            --s3-upload-concurrency 8 \
            --s3-no-check-bucket \
            "backup:$bucket/$archive_name"
        echo "$hash" | aws s3 cp - "s3://$bucket/$archive_name.md5"
        echo "$files" | aws s3 cp - "s3://$bucket/$archive_name.txt"
        msg "🟩 File $archive_name uploaded"
      fi
    fi
  )
}
Directory upload function starts with cleaning the path from parts like /./ and creating the archive name.
The archive will be named just like the directory, with a .tar.gz extension.
The subsequent process is best explained with a flowchart:
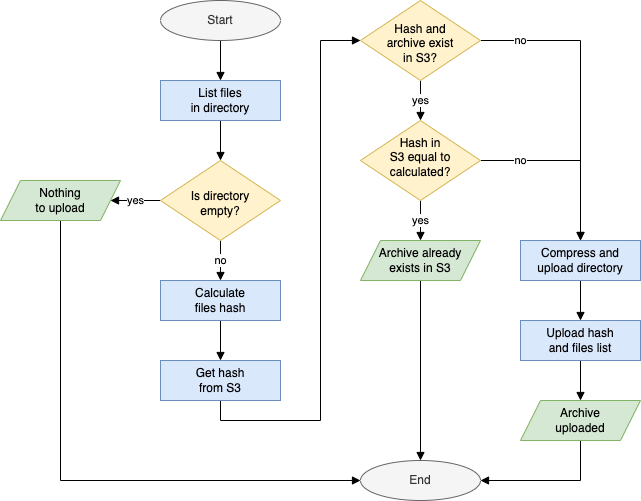
After the directory is compressed and uploaded, the script creates two additional text files in the S3 bucket. One contains the calculated MD5 hash of the files and the other files list.
Subdirectories backup
Since we compress the directory and calculate its hash to not re-upload it unnecessary, it makes sense to archive individual subdirectories separately. This way, if the content of one of them changes, only it must be updated, not everything.
At the same time, we should aim to have a smaller number of bigger archives instead of creating too many small ones. This will make the backup and restore process more effective, both in time and cost.
For those reasons, an optional parameter --split-depth defines how many levels down the directories tree script should go and create separate archives.
# Arguments:
# - path - the path relative to $root_path
# - depth - the level from the $root_path
traverse_path() {
  local path=$1
  local depth=${2-1}

  cd "$root_path/$path" || die "Can't access $root_path/$path"

  backup_path "$root_path/$path" "$path/_files" true

  # read directories to array, taking into account possible spaces in names, see: https://stackoverflow.com/a/23357277/2512304
  local dirs=()
  while IFS= read -r -d $'\0'; do
    dirs+=("$REPLY")
  done < <(find . -mindepth 1 -maxdepth 1 -type d -print0)

  if [[ -n "${dirs:-}" ]]; then # if dirs is not unbound due to no elements
    for dir in "${dirs[@]}"; do
      if [[ "$dir" != *\$RECYCLE.BIN && "$dir" != *.Trash-1000 && "$dir" != *System\ Volume\ Information ]]; then
        if [[ $depth -eq $split_depth ]]; then
          backup_path "$root_path/$path/$dir" "$path/$dir" false
        else
          traverse_path "$path/$dir" $((depth + 1))
        fi
      fi
    done
  fi
}
Each found directory is archived with the backup_path() function, the same as before.
Additionally, all the files in directories above the --split-depth level are archived as a _files.tar.gz.
To illustrate this, let’s take this files structure:
my_disk
├── browsing_history.txt
├── documents
│  ├── cv.doc
│  ├── chemtrails-evidence.pdf
│  ├── work
│  │  ├── report1.doc
│  │  └── report2.doc
│  └── personal
│     └── secret_plans.txt
├── photos
│  ├── 1947-07-02-roswell
│  │  └── evidence1.jpg
│  │  └── evidence2.jpg
│  └── 1969-07-20-moon
│     └── moon-landing-real-001.jpg
│     └── moon-landing-real-002.jpg
└── videos
   ├── area51.avi
   └── dallas-1963.avi
With --split-depth 1, the disk will be backed up as four archives:
my_disk
├── _files.tar.gz
├── documents.tar.gz
├── photos.tar.gz
└── videos.tar.gz
And with --split-depth 2:
my_disk
├── _files.tar.gz
├── documents
│  ├── _files.tar.gz
│  ├── work.tar.gz
│  └── personal.tar.gz
├── photos
│  ├── 1947-07-02-roswell.tar.gz
│  └── 1969-07-20-moon.tar.gz
└── videos
   └── _files.tar.gz
Example
./backup.sh -b backuptos3-backupbucket-xxxxxxxxxxxxx -n radziki -p "/Volumes/RADZIKI" --split-depth 1
2022-02-18 16:30:35 🔍 Listing files in "/Volumes/RADZIKI"...
2022-02-18 16:30:39 🟫 No files found
2022-02-18 16:30:39 🔍 Listing files under "/Volumes/RADZIKI/nat"...
2022-02-18 16:35:13 ℹ️ Found 55238 files
2022-02-18 16:35:13 #️⃣ Calculating hash for directory "/Volumes/RADZIKI/nat"...
2022-02-18 18:11:04 ℹ️ Hash is: 989626a276bec7f0e9fb6e7c5f057fb9
2022-02-18 18:11:05 ⬆️ Uploading file radziki/nat.tar.gz
Transferred:       41.684 GiB / 41.684 GiB, 100%, 2.720 MiB/s, ETA 0s
Transferred:            1 / 1, 100%
Elapsed time:   1h57m45.1s
2022-02-18 20:08:58 🟩 File radziki/nat.tar.gz uploaded
2022-02-18 20:08:58 🔍 Listing files under "/Volumes/RADZIKI/Photo"...
2022-02-18 20:12:43 ℹ️ Found 42348 files
2022-02-18 20:12:43 #️⃣ Calculating hash for path "/Volumes/RADZIKI/Photo"...
2022-02-18 22:19:42 ℹ️ Hash is: c3e347566fa8e12ffc19f7c2e24a1578
2022-02-18 22:19:42 ⬆️ Uploading file radziki/Photo.tar.gz
Transferred:      177.471 GiB / 177.471 GiB, 100%, 89.568 KiB/s, ETA 0s
Transferred:            1 / 1, 100%
Elapsed time:   8h12m19.6s
2022-02-19 06:32:02 🟩 File radziki/Photo.tar.gz uploaded
As you can see, two directories were found in the path and uploaded.
The first one was 41 GiB in total and was transferred in 1h57m. The other was 177 GiB and took 8h12m to upload. If you calculate that, it almost perfectly matches my internet upload speed of 50 Mbit/s.
Questions and answers
Why IAM user?
Generally, using IAM users is not the best practice. Instead, it’s far better (and more common) to use SSO and grant access through IAM roles. Furthermore, it’s even safer (and more convenient) to use tools like Leapp or aws-vault to manage AWS access.
However, credentials obtained this way are valid for only up to 12 hours and may require manual actions like providing an MFA token to refresh them. Depending on the directory size and your internet connection, uploading backup may take longer.
For that reason, we use an IAM user with static access credentials set directly in rclone. This user has access limited to only the backup bucket.
Putting the user access credentials directly in the rclone configuration has one additional perk. It allows for the backup to be done in the background without affecting your other work with AWS.
Why .tar.gz archives?
If you just want to upload the whole directory recursively to the S3 bucket, rclone copy
or sync
commands will handle it.
So why bother with compressing files into a .tar.gz archive?
Uploading or downloading a single archive file will be much faster than doing the same with hundreds and thousands of individual files. Since this is backup, not for regular storage, there is no requirement for quickly fetching a single file.
Working on a smaller number of big files also reduces costs for S3 operations PUT and GET operations.
This may be simplified in the future when the rclone gets the archive capability built-in.
Why stream archive?
The .tar.gz archive is streamed with the pipe (|) operator to the rclone rcat
command, which reads the data from the standard input and sends it to the storage.
The archive file is never created on the disk.
Thus you don’t need free space in memory or on the disk equal to the backup file size.
This, however, brings some consequences.
One is that the rclone does not know the total size of the archive upfront.
Sending a big file to the S3 is done with a multipart upload. First, the upload process is started, then the next chunks of the file are sent separately, and, finally, the transfer is completed. There is a limit, though, to 10.000 parts max. Thus each chunk must be big enough. Since rclone does not know the total file size, we must manually instruct it.
This is where the previously calculated $chunk_size_mb takes part.
By default, it’s set so the total file size limit is 1 TiB.
You can use the --max-size parameter to modify it.
chunk_size_mb=$((max_size_gb * 1024 / 10000 + 1))
The other consequence of streaming the archive file is that the rclone can’t calculate its checksum before uploading.
Why calculating hash?
Typically, the rclone calculates file checksum and compares it with the checksum of the file already existing in the storage.
For example, this happens when we back up a single file using rclone copy.
But since we are streaming the archive, rclone can’t calculate the checksum on its own, so we need to do it ourselves.
We never create the whole archive file locally, so we can’t calculate its hash. So instead, we calculate the MD5 of all the files and then compute the MD5 of those hashes:
hash=$(echo "$files" | tr '\n' '\0' | parallel -0 -k -m md5sum -- | md5sum | awk '{ print $1 }')
This hash is uploaded as a separate object next to the archive. On the next script run, the hash for the local files is re-calculated and compared with the one in the storage.
Calculating MD5 for thousands of files can be time expensive. However, the biggest bottleneck of the backup process is the upload speed. Therefore, calculating the hash and possibly skipping the archive upload can reduce the total process time, especially in the case of rarely modified files.
Why rclone?
rclone provides a layer on top of AWS SDK for interacting with S3 buckets. While the same could be achieved with AWS CLI, rclone displays upload progress when sending data from the input stream, and AWS CLI does not.
However, the progress shown by the rclone is not 100% accurate. rclone shows data as transferred once buffered by the AWS SDK, not when actually sent. For that reason, the displayed progress may go faster and slower or even stop from time to time. In reality, data is constantly uploaded.
Another reason to use rclone is that, because access credentials for rclone are set separately in its config file, ongoing backup upload does not interfere with other activities and tools that use local AWS credentials. So we can work with other AWS accounts at the same time.
Why S3 Glacier Flexible Retrieval?
AWS S3 has different storage classes, with various pricing per GB and operations.
The S3 Glacier Flexible Retrieval class is over 6 times cheaper per GB stored than the default S3 Standard. In the least expensive AWS regions (like us-east-1 or eu-west-1), the storage price is only $3.69 per TiB per month.
On the other hand, fetching objects from the S3 Glacier Flexible Retrieval is not instantaneous. Firstly you have to request object restore. It is free if you are okay with waiting 5-12 hours for it to be ready. Otherwise, it can be sped up by choosing the Expedited retrieval, but for $30 per TiB.
An even cheaper storage class is the S3 Glacier Deep Archive. Using it can further reduce costs to only $1.01 per TiB. But, contrarily to Flexible Retrieval, it does not provide an option to retrieve the data in less than a few hours. Also, there is no free data retrieval option, although it costs only $2.56 per TiB if you are willing to wait for up to 48 hours.
With personal backups in mind, data retrieval should be rare and, hopefully, not time-critical. Thus the S3 Glacier Flexible Retrieval storage class provides a reasonable balance between costs and data access options.
Keep also in mind that with the S3 Glacier Flexible Retrieval, you are billed for at least 90 days of storing your objects, even if you remove them sooner.
The storage class can be set with the --storage-class parameter.
Please see the S3 pricing page for all the details.
Problems and considerations
Automatic backups
Backups are best if they are done regularly. Otherwise, you can find yourself looking for the backup to restore and finding out that the last was done a year ago.
If you want to backup local files from your computer, nothing stops you from automating it with a CRON job.
Unfortunately, automation can be impossible with external drives, attached only from time to time. It relies only on your good practices.
Backup from Google Photos (and similar)
Apart from physical drives and local files, backing up photos and documents from services like Google Photos, Google Drive, etc., is not a bad idea either. Accidents happen, even with cloud services.
As a Google Photos user, I hoped to fetch photos with rclone. Unfortunately, it’s not possible to download photos in the original resolution this way, which makes it unfit for backup.
The only possibility I found is to use Google Takeout to get the data dump from Photos, Drive, GMail, and other Google services, and then upload it to S3 with the backup script.
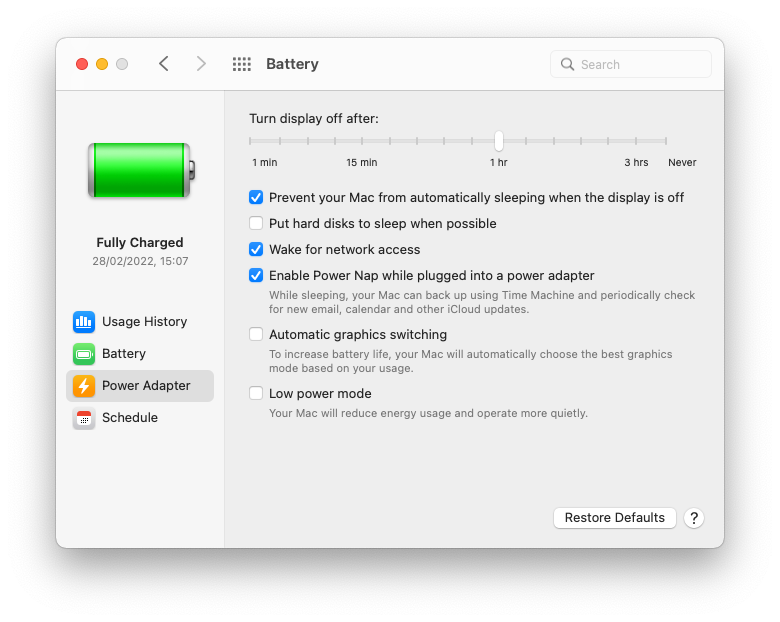
Disk operations vs power-saving mode
Starting backup and leaving the laptop for the night may not necessarily bring the best results. I did it and was surprised to see that calculating files checksum did not complete after 8 hours. But when I re-run the script again, it finished in an hour or so.
Even when not on the battery, computers tend to minimize background operations when not used.
On macOS, in Settings -> Battery -> Power Adapter, you can uncheck “Put hard disks to sleep when possible”. A more aggressive option is to disable sleep altogether.
Backblaze – an easy alternative
Please note: the links below are affiliate links.
While engineering your personal backup to S3 can be fun, there are simpler alternatives. One of them, and one of the best I found, is Backblaze.

For just a $9/month (or $99/year), you can have automated, unlimited data cloud backup. You can try it with a 15-day Free Trial: Backblaze Personal Backup.
Conclusion
250-lines Bash script is not a foolproof backup system. The backup is not incremental. It does not handle file modifications during the archive process.
Nonetheless, this is just what I need to back up my external drive from time to time and sleep without worrying about losing data if it will not work the next time I attach it to the computer.
The whole script with usage instructions is available on GitHub:
- 📨 algorithm-independent information about new posts
- 📘 my ebook about Serverless on AWS
- ✅ zero spam
Unsubscribe anytime.
Unsubscribe anytime.